Java Blog
DB JDBC Oracle big Blob Management by chunks
- By
- On 10/05/2025
- Comments (0)
Lately I've been thinking on how to store a blob and fetching it from the data base without consuming a lot of HeapMemory, in other words is there a way to stream data blobs into/from data base? like when we stream from/into files? -Let's suppose that your Blob's size is more than 2Go, then, if you use the traditional way of sending the blob into the data base, you are going to be using more than 2Go of RAM at a moment during the the RunTime.
- The common way to fetch a Blob From database
- Given SQL Function for getting a given blob by id: (This first item is called once in your code)

- Then you define your function in DB server by calling the following JDBC code:

- Then the JDBC call for fetching the blob from the database whenever you want to recover a blob

> as you can see at that stage we can be already overusing the memory, because of we are holding the whole blob in memory
- The common way to Insert a Blob into the database
- For inserting a Blob into database: there are two steps to follow, the first one is: creating an empty blob:

- Then you get your empty blob locator and you fill it with your data:

- Trick/Solution to avoid that HeapMemory OverUsage: For Insertion
The Trick is quiet simple, There are three steps to follow:
- Inserting an Empty blob, as it was introduced previously
- Create a temporary sub-blob which will contain a chunk of data that you want to send to your blob

- You define an SQL procedure which will be capable to recover your predefined blob and updates it with the amount of data and loop on the call of this procedure while there are chunks of data to update with your referenced blob
This is the function which will be running in the DB side to update the blob

This sample code below shows how to call the procedure from the java side to update the blob:

- Trick/Solution to avoid HeapMemory OverUsage: For Fetching
Here is a simple trick to fetch a chunk of blob from the database: again, it is based on the same concept as the inserting idea which is based on delegating a part of the job to the sql code: So in order to perform this operation, you need to:
- Define the following SQL function which will be called to fetch a specified part of the blob, by giving the parameters the size of the this amount and the starting offset:

- Here is the java code which calls this function:

Docker and Database Replication
- By
- On 04/10/2020
- Comments (0)
- In Containers
MySQL Replication DB
![]()
DB Replication can be done for various reasons sometimes to ensure we have a backup of the data directly from our database, to run analytics or check the data without disturbing the main database or Scaling out the DB for better performance.
In this post I will show you how to set up a master/slave MySQL configuration in production and developpement mode (through docker):
Production mode:
For production mode you need just install a mysql server and client ( here are the instruction to install a MySQL and how to use it within a localhost : For linux-UBUNTU):
$> sudo apt-get install mysql-server mysql-client
Then you can check the status of mysql service:
$>sudo service mysql status
After that as a root:
$>sudo mysql -u root -p
Optional: you can change a mysql User password as follow:
$ mysql> ALTER USER 'userName'@'localhost' IDENTIFIED BY 'New-Password-Here';
- Master DB Configuration:
$> sudo gedit /etc/mysql/mysql.conf.d/mysqld.cnf
we have to enable the following variables:
bind-address : server_ip_address
server-id = 1
log_bin = /var/log/mysql/mysql-bin.log
binlog_expire_logs_seconds = 864000 # which corresponds to 10 days
max_binlog_size = 100M
binlog_do_db = mydb_mhi
after that restart mysql service: $> sudo service mysql restart
We need to grant some privileges to the Slave DB so that it can access and replicate the data from the DB we mentioned in the config file, "mydb". We will execute the following commands to grant the privileges to the Slave DB: so from the mysql console:
$ mysql> GRANT REPLICATION SLAVE ON *.* TO 'root'@'server_ip';
Next we flush the privileges: $ mysql> FLUSH PRIVILEGES;
Now we go back to the mysql prompt and we create the DB that we want to replicate and add simple table (TABLE1) in it and lock it after that:
$mysql> CREATE SCHEMA mydb_mhi;
Query OK, 1 row affected (0.00 sec)
$mysql> USE mydb_mhi;
Database changed
$mysql>CREATE TABLE TABLE1 (id INTEGER not NULL, first VARCHAR(255), PRIMARY KEY ( id ))
Query OK, 0 rows affected (0.02 sec)
$mysql> INSERT INTO TABLE1 VALUES('1','MrAlpha');
Query OK, 1 row affected (0.01 sec)
$mysql> show master status;

Last and not least, we apply a read lock on the db and we go back to a new terminal session and we take a snapshot dump of the our DB:
$mysql>FLUSH TABLES WITH READ LOCK;
$> sudo mysqldump -u root -p --opt mydb_mhi > mydb_mhi.sql
Finally, we go back to the mysql prompt and we unlock the tables and we quit:
$mysql>UNLOCK TABLES;
$mysql>QUIT;
-SLAVE Configuration
Now for the slave configuration; it is straight forward, after installing MySQL server/client: we create the DB "mydb_mhi" that we want to replicate:
$mysql> CREATE DATABASE mydb_mhi;
$mysql>QUIT;
Next we import the DB content from the file to the current one:
$mysql>mysql -u root -p mydb_mhi < /tmp/mydb_mhi.sql
Then, we configure mysql slave server as following:
$> sudo gedit /etc/mysql/mysql.conf.d/mysqld.cnf
server-id= 2
relay-log= /var/log/mysql/mysql-relay-bin.log
log_bin= /var/log/mysql/mysql-bin.log
binlog_do_db=mydb_mhi
Next, we restart the mysql service: $>sudo service mysql restart
We log to the mysql prompt and we enable replication: (and thanks to the master status that we recovered earlier) we fire the following command:
$mysql>CHANGE MASTER TO MASTER_HOST='<master-server-ip>',MASTER_USER='root', MASTER_PASSWORD='myRootPsswd', MASTER_LOG_FILE='mysql-bin.000001', MASTER_LOG_POS= 156;
$mysql>START SLAVE;
And when you can show the status using the following command:
$mysql>SHOW STATUS;
Waiting for mysql_master database connection...
*************************** 1. row ***************************
Slave_IO_State: Waiting for master to send event
Master_Host: 172.19.0.2
Master_User: mydb_slave_user
Master_Port: 3306
Connect_Retry: 60
Master_Log_File: mysql-bin.000001
Read_Master_Log_Pos: 600
Relay_Log_File: mysql-relay-bin.000001
Relay_Log_Pos: 320
Relay_Master_Log_File: mysql-bin.000001
Slave_IO_Running: Yes
Slave_SQL_Running: Yes
Replicate_Do_DB:
Replicate_Ignore_DB:
Replicate_Do_Table:
Replicate_Ignore_Table:
Replicate_Wild_Do_Table:
Replicate_Wild_Ignore_Table:
Last_Errno: 0
Last_Error:
Skip_Counter: 0
Exec_Master_Log_Pos: 156
Relay_Log_Space: 527
Until_Condition: None
Until_Log_File:
Until_Log_Pos: 0
Dev Mode with Docker:

First you need to install docker and docker-compose:
$> sudo apt-get install docker
$> sudo apt-get install docker-compose
Then through docker you can pull the latest mysql image:
$> sudo docker pull mysql
and since we would like to check the status of our database through phpMyadmin client we are going to pull the latest version phpmyadmin image:
$>sudo docker pull phpmyadmin/phpmyadmin
Now that your environment is ready download the zip folder enclosed and run ./build.sh as root: (![]() mysql-master-slave.zip (54.42 Ko))
mysql-master-slave.zip (54.42 Ko))
$>sudo ./build.sh
This bash will initiate two instances of mysql container upon the ports 4406 and 5506 so it these ports are busy then you can change them in the docker-compose.yml file
in order to check the availibility of a port run the following command:
$>sudo lsof -i:PORT_NUMBER
After That: check the docker network config, so you can bind your phpmyadmin container to the right db:
$>sudo docker network ls

as you can see the network name that is used by our containers name is "mysql-master-slave_overlay"
then, to run and bind the phpmyadmin container to mysql containers we run the following command:
$>sudo docker run --network mysql-master-slave_overlay --name myadmin -d --link mysql_master:db -p 8081:80 phpmyadmin/phpmyadmin
Next you can go to: http://localhost:8081/ :---> to login use "root" and as password use "111" which the master db password

Now we can check the functionning of our configuration:
$>sudo docker ps
$>sudo docker exec -it mysql_master bash
##>mysql -u root -p'111' mydb
mysql> create table if not exists test(code int);
# Query OK, 0 rows affected, 1 warning (0.01 sec)
mysql> insert into testvalues (21), (44);
with the same manner you can check whether these values are updated in the slave db
$>sudo docker exec -it mysql_slave bash
mysql -u root -p'111' mydb
mysql> select * from test;
Create your first R Package
- By
- On 09/05/2020
- Comments (0)
- In R programing
In you RStudio run the command:
>devtools::create("mymhipackage")
After that, a new RStudio window will show up: It will have the following structure

Under the R folder we are going to create our file functions for instance: we want to create a function that checks wether a list of words contains at least one specific word:
let's call this function regex_check: for that we create the file: regex_check.R:
#' Regex check
#'
#' This function takes as parameter a target list of strings and a pattern
#' string and checks if one of the target strings contains the pattern
#'
#' @param target_list_string list of words
#' @param pattern
#' @return true or false
#' @export
regex_check <- function(target_list_string,pattern){
for(k in 1:length(target_list_string))
{
if(grepl(pattern,target_list_string[k])[1]))
{
return(TRUE)
}
}
return(FALSE)
}
Then we load these libraries:
> library(usethis)
> library(devtools)
> library(roxygen2)
Next, we run the document method, which will generate the associated documentation under the folder man:
>document()

the new folder Structure of the packge will look like that:

After all, if we want to test our package we have to load and install it:
> devtools::load_all()
> devtools::install()
That's it ;-) we can go back to the main project:
and run :
>library(mymhipackage) # in order to load your first library
Finally last tip: if you want to unload the library because you want to modify something in it, then run the following comand:
>detach("package:mymhipackage", unload=TRUE)
How to list file names within a folder based on a pattern?
- By
- On 29/01/2020
- Comments (0)
- In Unix/Linux
If you want to search for files with name containing "*pattern*" in all subdirectories:
find /path/to/folder -type f -name "*pattern*"
And to search to a certain depth "alpha" of subdirectories use the following command:
find /path/to/folder -maxdepth alpha -type f -name "*pattern*"
Example of File Splitter Java 8
- By
- On 12/08/2018
- Comments (1)
- In Java 8 Stream advanced
Often times, in software development we are faced to handle large data, and usually this data is represented as one large file, in this article I will share with you through a specific example how to handle such case.
Let's consider a large file of 253 572 lines, which contains the 4 companies'quotations during a certain period of time (the values that are presented within this file are fake and duplicated, so do not use it for any further financial studies)
So, the content of this file is listed as following:
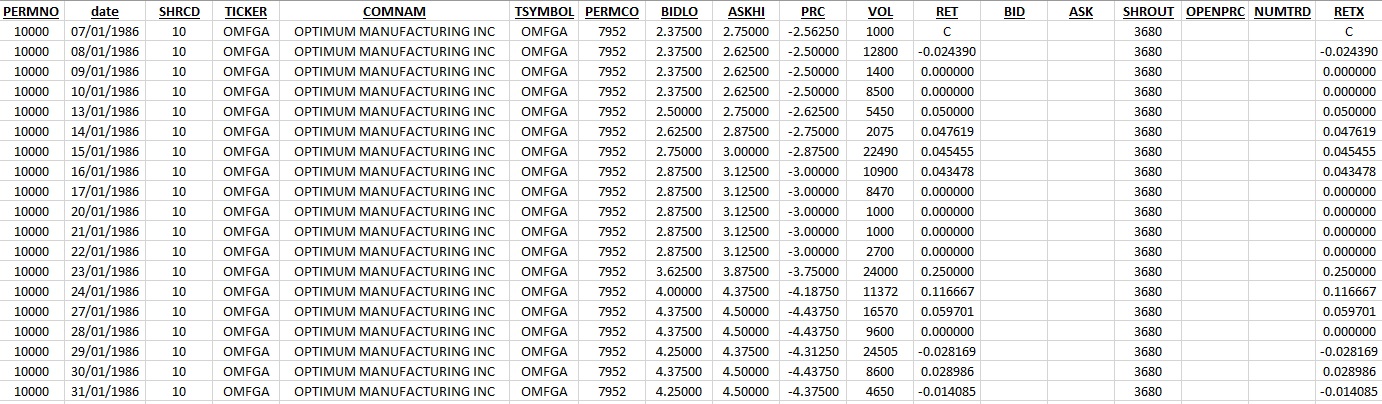
The purpose of our program is to split this file into 4 files depending on companies code (which is listed in the first column under the tag "PERMNO"), we want also that the name of each output file will be like: "CompanyGrossData_" + premno + ".txt" for example for the company code 10000 as an output file we will have: CompanyGrossData_10000.txt
The java 8 JDK introduced a quite light feature within Files class which allows to browse the lines of a file whether sequentially or in parallel, this method is:
public static Stream<String> lines(Path path) throws IOException {
    BufferedReader br = Files.newBufferedReader(path);
    try {
But you should be careful while using this method, it should be used in an autocloseable "try catch" statement ,otherwise while processing the lines of the many files/one large file you can get a "too many files opened " or "an out of memory" Exceptions; in our example we will code as following:
try (Stream<String> lFileStream = Files.lines(file.toPath()).parallel())
{


    System.out.println("["+ZonedDateTime.now().format(DateTimeFormatter.ISO_ZONED_DATE_TIME)
            +"] Start Splitting Process");
    lFileStream.filter(line -> !line.contains("PERMCO")).forEach(line -> {
        String premno = StringUtils.getPremnoFromline(line);

        File outputFile =
                new File(outputDirectory + File.separator + "CompanyGrossData_" + premno + ".txt");
        dumpLineIntoFile(outputFile, line);
        getNextUniqueIndex();
        if(counter.intValue()%(100000)==0)
        {
            System.out.println("["+ZonedDateTime.now().format(DateTimeFormatter.ISO_ZONED_DATE_TIME)
                    +"] Number Of treated lines are: "+ counter
                    +" Spent Time: "+(System.currentTimeMillis() - startTime)/1000+" Seconds");
        }
    });

}
....
you can clone the code from my github page: https://github.com/mhimehdi/FileSplitter
Java Sockets under the hood
- By
- On 11/04/2018
- Comments (0)
- In Sockets Programming
Summary Before we start coding:
- An Endpoint is a combination of Port and IP address, so every TCP connection can be identified by a pair of Endpoints
- Server waits listening to the socket (which is identified by a server local port and its IP address) for a client to make a connection request
- Client tries to rendezvous with the server’s machine and port
After this brief introduction we will introduce some classes that implements the tools which will need to make two systems or more communicating data between each other.
Let’s see a little bit under the hood:
The java.net package provides the class “Socket” which implements one side of the bidirectional connection, by the way, one of the provided constructors of this class takes as input: the remote IP address and port. The class “Socket” is called also client socket, it sits on top of a platform-dependent implementation, hiding the details of any particular system from your Java program. By using the java.net.Socket class instead of relying on native code, your Java programs can communicate over the network in a platform-independent fashion.
Additionally, java.net includes the ServerSocket class, which implements the server-side socket, which servers can use to listen for and accept connections to clients. Later on, we will see how to use the Socket and ServerSocket classes in sample code.
There are some other classes which provide other features, like connecting to a remote web server, the related classes are (URLConnection, URLEncoder), these classes are probably more appropriate than the socket classes. In fact, URLs are a relatively high-level connection to the Web and use sockets as part of the underlying implementation, in the next chapters we will see how to deal with those classes.
Introduction to sockets
- By
- On 10/04/2018
- Comments (0)
- In Sockets Programming
Java uses the same concept as UNIX I/O (input/output):
User Process towards an object or device, it opens (read or write data from/to it) à closes it, to inform the system that this object or device is not used anymore.
When facilities for InterProcess Communication (IPC) and networking were added to Unix, the idea was to make the interface to IPC looks similar to file I/O. In Unix, a process has a set of I/O descriptors that one reads from and writes to. These descriptors may refer to files, devices, or communication channels (sockets). The lifetime of a descriptor is made up of three phases: creation (open socket), reading and writing (receive and send to socket), and destruction (close socket).
What you should keep in mind:
A socket is one endpoint of a two-way communication (bidirectional communication) link between two programs running on the network. A socket is bound to a port number so that the TCP layer can identify the application that data is destined to be sent to.
Example
Normally, a server runs on a specific computer and has a socket that is bound to a specific port number. The server just waits, listening to the socket for a client to make a connection request.
On the client-side: The client knows the hostname of the machine on which the server is running and the port number on which the server is listening. To make a connection request, the client tries to rendezvous with the server on the server's machine and port. The client also needs to identify itself to the server so it binds to a local port number that it will use during this connection. This is usually assigned by the system.
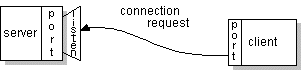
If everything goes well, the server accepts the connection. Upon acceptance, the server gets a new socket bound to the same local port and also has its remote endpoint set to the address and port of the client. It needs a new socket so that it can continue to listen to the original socket for connection requests while tending to the needs of the connected client.
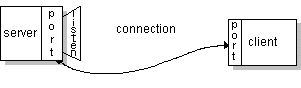
On the client side, if the connection is accepted, a socket is successfully created and the client can use the socket to communicate with the server. And henceforth, the client and server can now communicate by writing to or reading from their sockets.
References:
https://docs.oracle.com/javase/tutorial/networking/sockets/definition.html
TCP/IP and UDP/IP communications
- By
- On 09/04/2018
- Comments (0)
- In Sockets Programming
There are two communication protocols that one can use for socket programming: datagram communication and stream communication
Datagram communication (UDP):
The datagram communication protocol, known as UDP (user datagram protocol), is a connectionless protocol, meaning that each time you send datagrams, you also need to send the local socket descriptor and the receiving socket's address. As you can tell, additional data must be sent each time a communication is made. In other words, “a datagram is an independent, self-contained message sent over the network whose arrival, arrival time, and content are not guaranteed.”
Stream Communication or TCP (Transmission Control Protocol):
The stream communication protocol is known as TCP (transmission control protocol). Unlike UDP, TCP is a connection-oriented protocol.
To do communication over the TCP protocol, a connection must first be established between the pair of sockets. While one of the sockets listens for a connection request (server), the other asks for a connection (client). Once two sockets have been connected, they can be used to transfer data in both (or either one of the) directions.
Now, you might ask what protocol you should use -- UDP or TCP? This depends on the client/server application you are writing. The following discussion shows the differences between the UDP and TCP protocols; this might help you decide which protocol you should use.
In UDP, as you have read above, every time you send a datagram, you should send the local descriptor and the socket address of the receiving socket along with it. Since TCP is a connection-oriented protocol, on the other hand, a connection must be established before communications between the pair of sockets start. So, there is a connection setup time in TCP.
In UDP, there is a size limit of 64 kilobytes on datagrams you can send to a specified location, while in TCP there is no limit. Once a connection is established, the pair of sockets behaves like streams: All available data are read immediately in the same order in which they are received.
UDP is an unreliable protocol -- there is no guarantee that the datagrams you have sent will be received in the same order by the receiving socket. On the other hand, TCP is a reliable protocol; it is guaranteed that the packets you send will be received in the order in which they were sent.
In short, TCP is useful for implementing network services -- such as remote login (rlogin, telnet) and file transfer (FTP) -- which require data of indefinite length to be transferred. UDP is less complex and incurs fewer overheads. It is often used in implementing client/server applications in distributed systems built over local area networks.
Count number of files in directory
- By
- On 02/04/2018
- Comments (0)
- In Unix/Linux
find . -type f | wc -l
Explanation:
find . -type f finds all files ( -type f ) in this ( . ) directory and in all sub directories, the filenames are then printed to standard out one per line.
This is then piped | into wc (word count) the -l option tells wc to only count lines of its input.
Together they count all your files.
Semaphores
- By
- On 08/11/2017
- Comments (0)
- In Multithreading
Definition
A counting semaphore. Conceptually, a semaphore maintains a set of permits. Each blocks if necessary until a permit is available, and then takes it. Each adds a permit, potentially releasing a blocking acquirer. However, no actual permit objects are used; the Semaphore just keeps a count of the number available and acts accordingly. Semaphores are often used to restrict the number of threads than can access some (physical or logical) resource. For example, here isa class that uses a semaphore to control access to a pool of items:
package com.wmp;

import java.util.concurrent.Semaphore;

/**
 * PackageName com.wmp
 * Created by mhi on 08/11/2017.
 */
class Pool
{
  private static final int MAX_AVAILABLE = 100;
  private final Semaphore available = new Semaphore(MAX_AVAILABLE, true);

  public Object getItem() throws InterruptedException
  {
    available.acquire();
    return getNextAvailableItem();
  }

  public void putItem(Object x)
  {
    if (markAsUnused(x))
      available.release();
  }

  protected Object[] items = new String[10];// ... whatever kinds of items being managed
  protected boolean[] used = new boolean[MAX_AVAILABLE];

  protected synchronized Object getNextAvailableItem()
  {
    for (int i = 0; i < MAX_AVAILABLE; ++i)
    {
      if (!used[i])
      {
        used[i] = true;
        return items[i];
      }
    }
    return null; // not reached
  }

  protected synchronized boolean markAsUnused(Object item)
  {
    for (int i = 0; i < MAX_AVAILABLE; ++i)
    {
      if (item == items[i])
      {
        if (used[i])
        {
          used[i] = false;
          return true;
        }
        else
          return false;
      }
    }
    return false;
  }
}
Step by Step
An easy way to get used to semaphores is to experiment, let's consider this sample code:
Semaphore sem = new Semaphore(1);

try
{
  sem.acquire();
  System.out.println("Current available Permits: "+sem.availablePermits());
  sem.release();
  System.out.println("Current available Permits: "+sem.availablePermits());
}
catch (InterruptedException e)
{
  e.printStackTrace();
}
here is the result of the execution:
Current available Permits: 0
Current available Permits: 1
Description:
we created the object sem of the class semaphore with one available permit, then we called the method acquire on sem which requests to get a permit if it is available, that's why the first permit value printed was 0 then after release we got back 1
Benchmark (JMH)
- By
- On 24/09/2017
- Comments (2)
- In Code Performance
In this article, I will talk about the conventional (traditional) way of benchmarking the performance of a portion of java code. Next, I will emphasize the inconvenient of this method. And in the last paragraph, I will show you how to build up a consistent way of benchmarking your java code (Thanks to JMH Benchmark library).
The Timer of The JVM:
Often, we are confronted to measure the execution speed of a portion of code but this task is very complicated, when it comes to use traditional tools like JVM timer. Take, for example, the mathematical function "logarithm": measuring the time of calculation of the logarithm of a java float does not seem very complicated; a simple "timing" using the system date in a main ()
/**
 * PackageName PACKAGE_NAME
 * Created by mhi on 24/09/2017.
 */
public class MyBenchmarkClass
{
  public static void main(String[] args)
  {
    // start stopwatch
    long startTime = System.nanoTime();
    // Here is the code to measure
    double log42 = Math.log(42);
    // stop stopwatch
    long endTime = System.nanoTime();
    System.out.println("log(42) is computed in : " + (endTime - startTime) + " ns");
  }
}
Unfortunately, things are not that simple. Indeed, the recorded durations are quite variable and, on the other hand, they aren’t really representative; There are several reasons for this:
- The JVM does not execute code as it is written: the JIT in runtime can optimize the java code, reorder instructions, or even delete unnecessary instructions (this is typically what happens here: log42 is unused!)
- Moreover, it does not execute the same code deterministically in every execution: the JIT can decide to compile on-the-fly the bytecode in native code, instead of interpreting it (by default, in the 10000th call)
- Also, the physical load of the machine (CPU, memory, other processes ...) at the runtime can vary according to its overall use, and slow down the program. Basing the study on a single measure and hoping for a representative result is therefore illusory ...
Finally, How can we measure the performance of a given code?
Let's Benchmark our code Using JMH:
First steps to follow to set up the JMH library for use:
- Download JMH benchmark project generator (the Maven archetype jmh-java-benchmark-archetype)
- Keep an eye on the associated java-doc
- It is recommended to use JMH with Maven, to create a benchmark project.
Creation of the projet JMH
To generate the benchmark project, use the archetype jmh-java-benchmark-archetype:
$ mvn archetype:generate \
-DinteractiveMode=false \
-DarchetypeGroupId=org.openjdk.jmh \
-DarchetypeArtifactId=jmh-java-benchmark-archetype \
-DarchetypeVersion=1.5.2 \
-DgroupId=fr.mhi \
-DartifactId=jmh-sample-benchmak \
-Dversion=1.0-SNAPSHOT
The archetype generates a JAR project called jmh-example-benchmark, containing a pom.xml, declaring dependencies to the JMH JARs and plugins required for the build.
Now, here is the way we write method to benchmark with JMH: "The archetype has also generated a benchmark class skeleton, called MyBenchmark, in which there is a testMethod () method, annotated by a @Benchmark indicating to JMH where the code to benchmark is"
/**
 * PackageName PACKAGE_NAME
 * Created by mhafidi on 24/09/2017.
 */
public class MyBenchmarkClass
{

  @Benchmark
  public void testMethod()
  {
    // This is a demo/sample template for building your JMH benchmarks. Edit as needed.
    // Put your benchmark code here.</h4>
  }

}
One or more annotated methods will be written in the same way as a JUnit test class; each will be benchmarked by JMH. It will be possible to compare different codes. I will take as an example the calculation of the logarithm, using different libraries:
- java.lang.Math.log () of the JDK8
- org.apache.commons.math3.util.FastMath.log () from Apache commons Maths
- odk.lang.FastMath.log () from javafama
- odk.lang.FastMath.logQuick () from javafama also
/**
 * PackageName PACKAGE_NAME
 * Created by mhafidi on 24/09/2017.
 */
public class MyBenchmarkClass
{

  @Benchmark
  public double benchmark_logarithm_jdk()
  {
    return java.lang.Math.log(42);
  }

  @Benchmark
  public double benchmark_logarithm_apache_common()
  {
    return org.apache.commons.math3.util.FastMath.log(42);
  }

  @Benchmark
  public double benchmark_logarithm_jafama()
  {
    return odk.lang.FastMath.log(42);
  }

  @Benchmark
  public double benchmark_logarithm_jafama_logQuick()
  {
    return odk.lang.FastMath.logQuick(42);
  }

}
Before launching the benchmark, of course, you have to build a Maven build of the project, generate technical code, assemble it with the JMH Runner, and package it all in an executable "uber" JAR benchmark.jar:
jmh-sample-benchmark$ mvn clean package
Now we will run the jar to start the benchmark:
jmh-sample-benchmark$$ java -jar target/benchmark.jar
Here we go! The benchmark runs. The execution logs are displayed on the standard output and gives the final results:
Benchmark                                                            Mode    Cnt         Score       Error    Units

MyBenchmarkClass.benchmark_logarithm_apache_common                   thrpt   200         40,112      ± 0,113  ops/us
MyBenchmarkClass.benchmark_logarithm_jafama                          thrpt   200         95,502      ± 0,255  ops/us
MyBenchmarkClass.benchmark_logarithm_jafama_logQuick                 thrpt   200         142,486     ± 0,604  ops/us
MyBenchmarkClass.benchmark_logarithm_jdk                             thrpt   200         341,494     ± 3,196  ops/us
The result of each method tested is obtained by line. The contents of the columns give us:
the mode of benchmark, means the type of measurements performed: here thrpt (for Troughput), that is to say an average flow of operations (operations performed per unit of time)
Cnt (for count) gives us the number of measurements taken to calculate our score: here 200 measurements
Score, means the calculated average throughput value
Error, represents the margin of error of this score
Units, is the unit of the score: here the score means the operations per microsecond
In our example the benchmark result gives that: java.lang.Math.log () of the JDK8 gets the best result, with an average of 341,494 operations per second!
Finding of the process using a specific port
- By
- On 03/09/2017
- Comments (0)
- In Unix/Linux
$ sudo ss -lptn 'sport = :80'
State   Local Address:Port  Peer Address:Port
LISTEN  127.0.0.1:80        *:*                users:(("mhi",pid=125004,fd=12))
- You can also use the same invocation you're currently using:
$ sudo netstat -nlp | grep :80
tcp  0  0  0.0.0.0:80  0.0.0.0:*  LISTEN  125004/mhi
-You can also use lsof:
$ sudo lsof -n -i :80 | grep LISTEN
nginx   125004 mhi    3u  IPv4   6645      0t0  TCP 0.0.0.0:80 (LISTEN)
Split method
- By
- On 29/04/2017
- Comments (0)
- In String Utils
 The method split allows you to split a given string into an array of strings. Here is a set of examples that show you different kind of use of this method:
- Example of extraction of the date from a given String:
static public Calendar exampleSplitMethod()
{

  Calendar date = new GregorianCalendar();
  String inputString="<2017.03.09 16:46:14 080 -0500><I><data><Information>";

  inputString=inputString.replaceFirst("<",""); //we delete the firt delimiter because,
                                               // split method will replace it with an empty value
  String delimiters = "[\\<.\\>\\s:]+";
  String[] tokens=inputString.split(delimiters,-1);

  Integer year = Integer.parseInt(tokens[0]);
  Integer month= Integer.parseInt(tokens[1]);
  Integer day= Integer.parseInt(tokens[2]);

  date.set(year,month,day);
  return date;

}
Glossary
- By
- On 26/09/2016
- Comments (0)
- In Dubious Java 8
What is a Stream
- By
- On 25/09/2016
- Comments (0)
- In Dubious Java 8
- Object which is used to define a set of Operations
- The stream doesn't pocess the data on which it executes its operations
- The stream doesn't modify the data that is under its treatment
- The stream treats the data on one pass execution
- The stream is algorithmically optimized and enabled to be used for parallel executions
Download presentations
ArrayList et LinkedList sont dans un bateau [José Paumard,]![]() arraylist.pdf (5.3 Mo)
arraylist.pdf (5.3 Mo)
OutOfMemoryError : quel est le coût des objets en java [Jean-Philippe BEMPEL] ![]() outofmemory.pdf (1006.05 Ko)
outofmemory.pdf (1006.05 Ko)
Retours sur Java 8: meilleurs pratiques [Jean-Michel Doudoux] ![]() retourssurjava8devoxxfr2016-160503204151.pdf (1.18 Mo)
retourssurjava8devoxxfr2016-160503204151.pdf (1.18 Mo)
Introduction To Lambda Expressions
- By
- On 21/04/2016
- Comments (0)
- In Dubious Java 8
What is a Lambda?
- A Lambda is a Function
- A function is a computation that takes parameters and returns a value
- Until Java8 , function could only be implemented using methods
- A lambda enables functions to be passed around or stored like data (which enables to pass lambdas as arguments)
Software Developer
- By
- On 25/01/2016
- Comments (0)
- In About Software
A software developer is the technical and creative mind behind computer, server and mobile programs. They design, build and maintain software that is used to run a variety of devices and networks.
A degree in Computer Science is often required, along with strong analytical, communication and problem solving skills. A software developer should have working knowledge of industry trends and be up-to-date on the various programming languages available.
Software developers work with various members of an organization (management, IT, etc.), and independently to complete projects. Software developers need to be intrinsically motivated, and be able to work within a team setting.
He is a list of software developer skills
- Ability to Work Independently and Within Groups
- Analyze User Needs
- Analytical Thinking
- Background in Programming or Computer Science/Engineering
- Build Business Logic of Software
- Comfortable Writing and Analyzing SQL Queries
- Create Complex Databases for Organizations
- Create Flow Charts
- Critical Thinking
- Design, Test, and Develop Software to Meet User Needs
- Develop Software Applications
- Develop Software From Scratch
- Document Application Process for Future Maintenance and Upgrades
- Ensure Software Functions Normally Through Software Maintenance and Testing
- Estimate Project Cost
- Estimate Scope of Project
- Execute Test Plans
- Hands-On Software Troubleshooting Experience
- Knowledge of Backend Development Best Practices
- Maintain User Manuals and Training Materials
- Manage Project Build Lifecycle
- Monitor Software Performance Tests
- Provide Input to Improve Business Processes
- Provide Reports as Necessary
- Recommend Software Upgrades
- Research and Consult About Potential Software and/or System Changes
- Revise Programs for Corrections, Enhancements, or Environment Changes
- Share Knowledge and Expertise with Fellow Team Members
- Solid Understanding of Company’s Needs
- Source Control Management Experience
- Strong Problem Solver
- Strong Oral and Written Communication
- Thorough Understanding of Data Structures and Algorithms
- Understand Software Design Patterns
- Write and Maintain Software

Software Engineers
- By
- On 25/01/2016
- Comments (0)
- In About Software
Software engineers apply various principles and techniques to the design, development, testing, and review of software.
A degree in Computer Science is required, along with strong analytical and problem solving skills. A software engineer should always be actively seeking new technology to learn quickly, and have outstanding communication and interpersonal skills.
Software engineers must be intrinsically motivated and have experience with various programming languages.
Here is a list of software engineer skills:
- Ability to Analyze Complex Technical Information
- Analyze Business Requirements and Assess Impact With Existing Database Architecture
- Analyze, Design and Implement Database Structures
- Conduct Research
- Consistently Seeking and Learning New Technology
- Detail Oriented
- Enhance the Functional and Technical Aspects of Products
- Excellent Problem Solver
- Experience Building Software Applications
- Experience With Source Code and Version Repository
- Familiar with UI Toolkits and Frameworks
- Experience with scripting languages (such perl, shell python...)
- Experience with database languages such SQL
- Lead and Deliver Complex Software Systems
- Manage Multiple Projects in a Deadline-Driven Environment
- Passion for Developing Engaging Consumer Experiences
- Previous Experience Working Within an Agile Scrum Team
- Provide Development and Testing Support of Other Engineers
- Solid knowledge of an OOP language (java for example)
- Strong Oral and Written Communication
- Strong Problem Solver
- Thorough Understanding of Computer Architecture, Operating Systems, and Data Structures
- Thrive in Dynamic, Fast-Paced Environments
- Transform Requirements into Design Concepts and ERDs
- Troubleshoot and Debug Issues
- Understand Software Engineering Best Practices

Easy Example Java 8 Streams
- By
- On 23/01/2016
- Comments (0)
- In Dubious Java 8
import java.util.ArrayList;
import java.util.Arrays;
import java.util.stream.Collectors;

/***
 * PackageName PACKAGE_NAME
 * Created by mhafidi on 30/04/2017.
 * <p>
 * * A simple introduction to using Streams && with Collectors
 * * @title Example Java 8 Dubious_1
 * * @author MHI
 * * @since Jan 27, 2016
 **/


//The following example will show you how streams can shrink your code and make it easier to maintain.

public class HelloLambdaExpressionStream
{
  final static String ALPHA = "alpha";

  private HelloLambdaExpressionStream()
  {

  }

  public static void main(String args[])
  {

    //let's consider the following string array:
    ArrayList<String> lStringList = new ArrayList<>(Arrays.asList("alpha_1", "alpha_2", "beta", "gamma"));

    //now, we would like to collect all the strings that contain the expression "alpha" into a new collection.
    //1) first solution: a trivial way to that but not very elegant is the following
    ArrayList<String> lnewStringList = new ArrayList<>();
    for (String lelt : lStringList)
    {
      if (lelt.contains(ALPHA))
      {
        lnewStringList.add(lelt);
      }

    }

    //2) second solution: Stream java 8 consideration
    ArrayList<String> lnewStringListJava8 = new ArrayList<>(lStringList.stream().filter(t -> t.contains(ALPHA)).
    collect(Collectors.toList()));

  }

}